¶ Work stock (list)
Click on this link to watch the instruction video: instruction video “work stock”
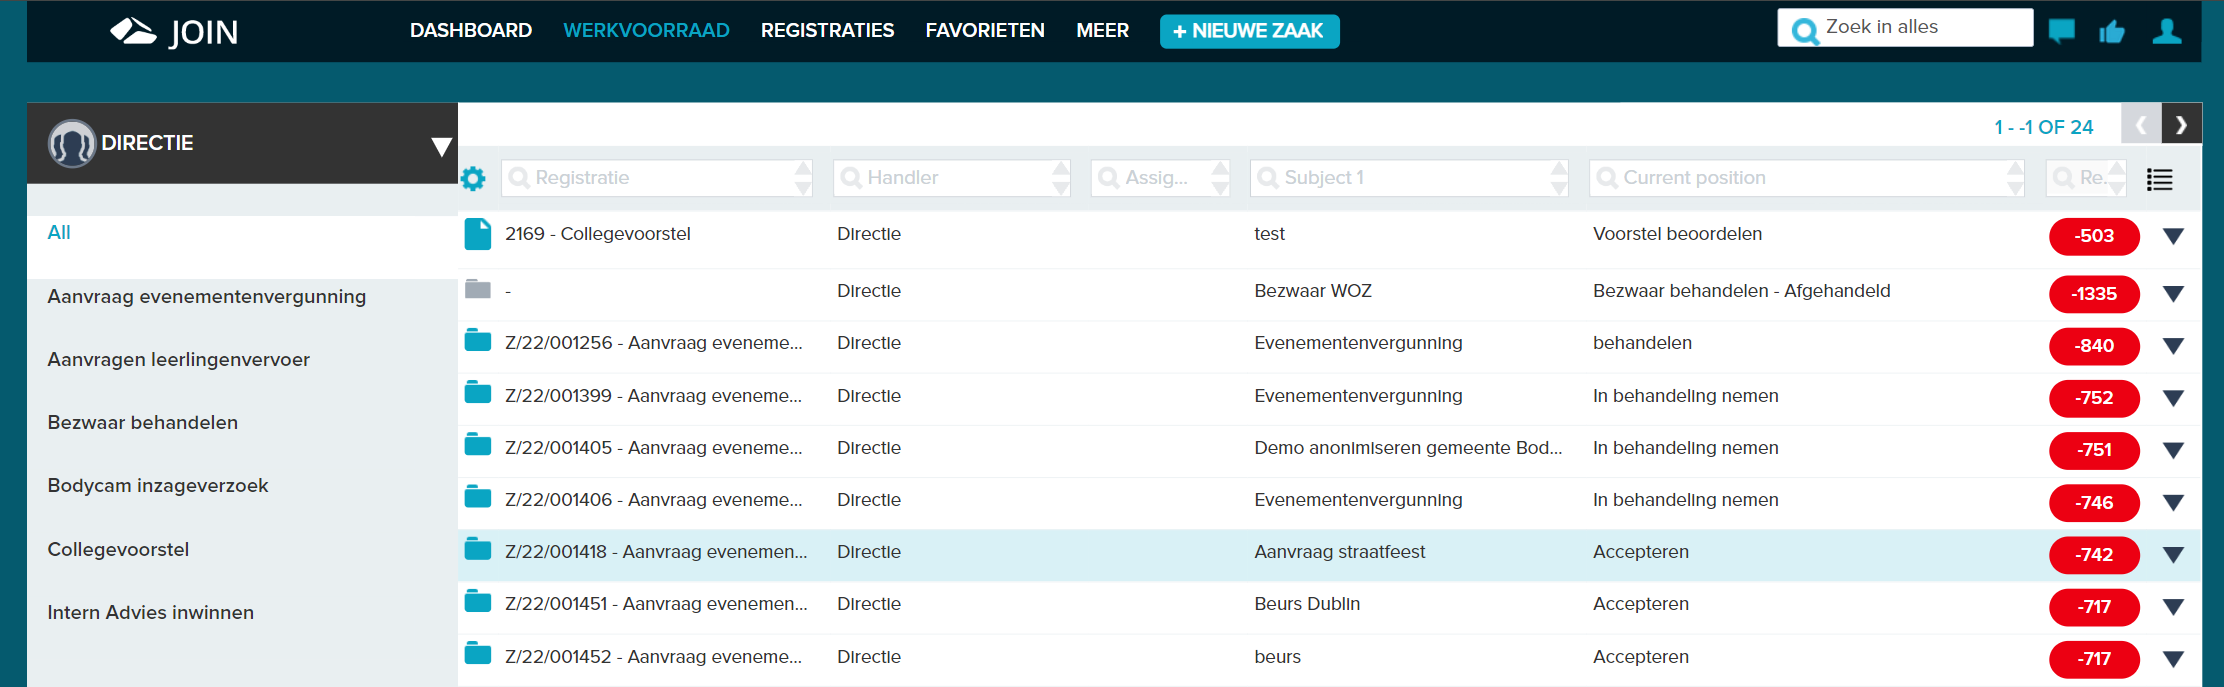
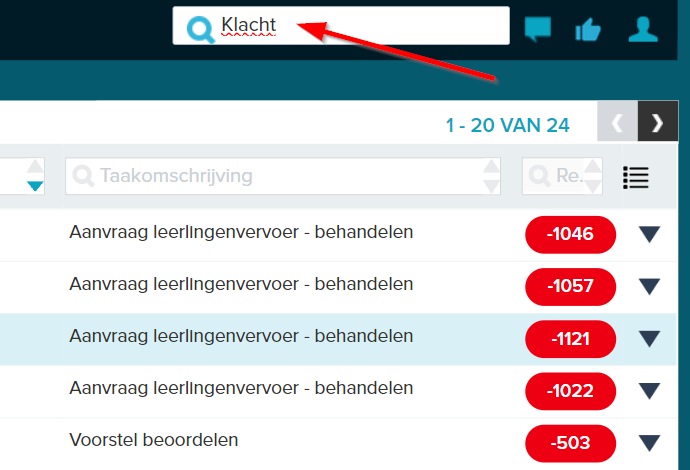
The work list is the overview of your outstanding activities. From the work list, you can handle outstanding actions on your cases and documents. You can quickly go to your work list via the navigation (top left). You will then be taken to the overview page:
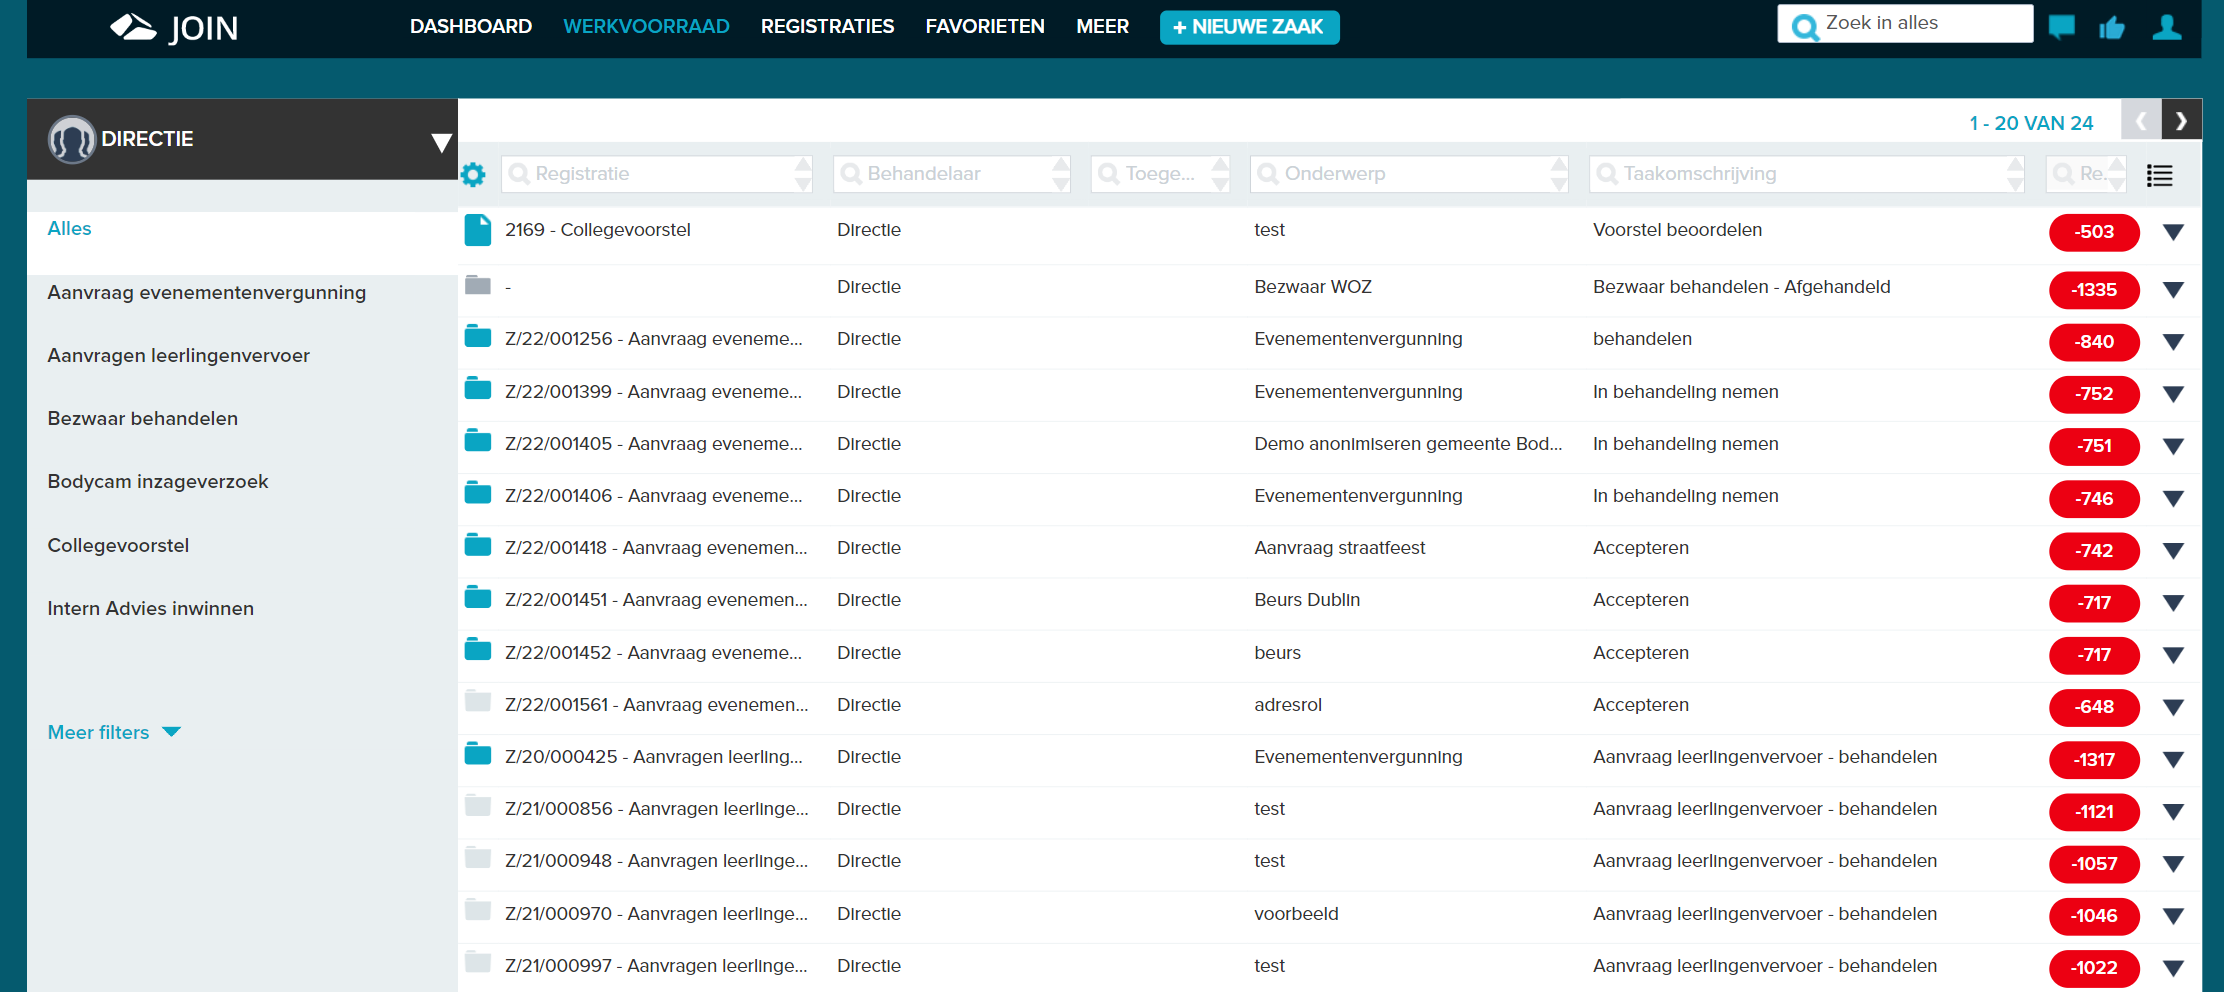
The work list consists of a left panel and a right panel.
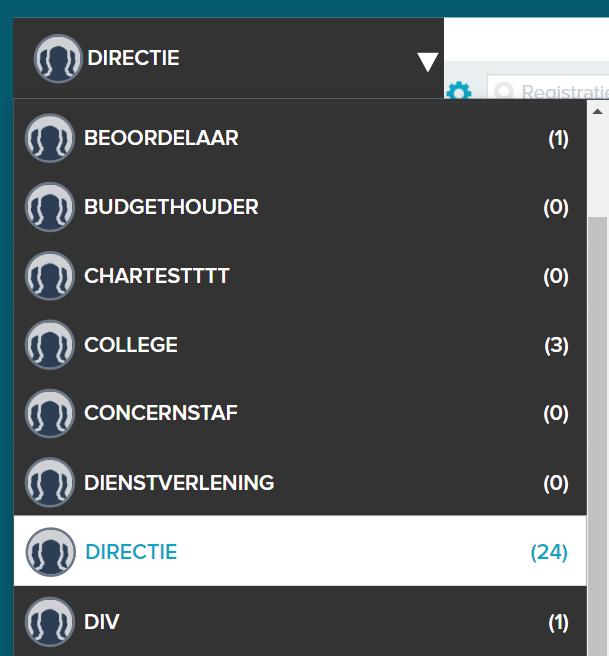
In the left panel you can select the work list you want to get started with. This can be your own work list, the work list of a colleague for whom you perform work (delegation of actions) or the work list of one or more units (for example a department or a team). These units are referred to as “user roles” within JOIN.
When you have selected a work list, you will see a first classification of the activities by collection below. We call this “book filters” in JOIN. For example, if you have an action on an outgoing document, we will show the first filter here. All activities of your work list are displayed via “all”.
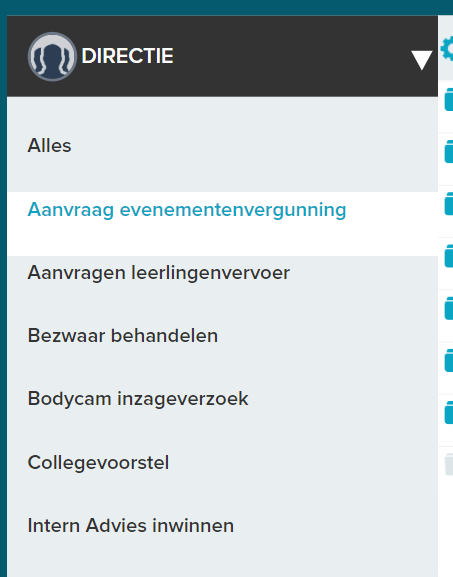
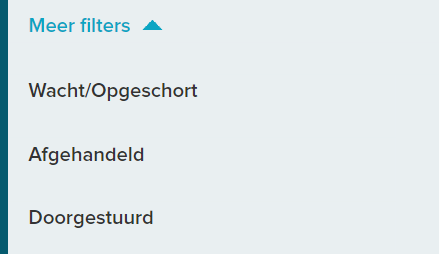
Under the book filters you will see “more filters” in blue. This is a fold-out panel, where we show parts that are less frequently used:
¶ Dealing with actions
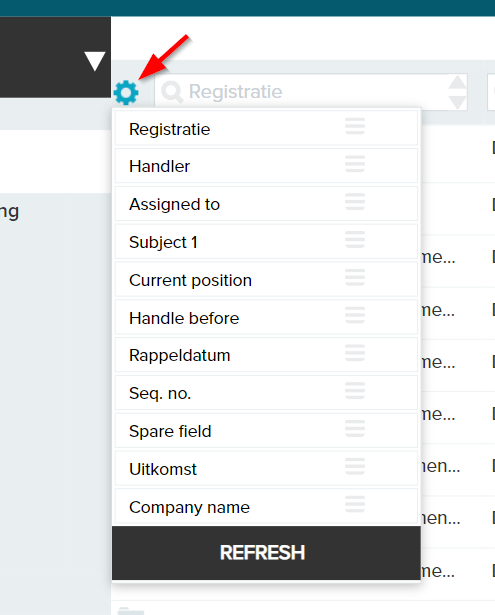
You can find your open tasks in the work list. All actions have a final treatment or reminder date (the “traffic light”). In the left panel your work list is visible as well as that of your teams or colleagues with whom you work. In the right panel you will find an overview of the tasks per work queue. You determine the layout of the work stock yourself. Via the gear wheel (top left) you can determine which data is shown in the 4 columns.
¶ Progress indicator: The traffic light
For all tasks / actions with a final handling date (the reminder date), the number of days remaining - including a corresponding color - is shown in the final column (the traffic light column). If you are still well on time, it will be green, if you approach the deadline it will turn orange and red when the deadline is exceeded. From version 6.22, the administrator can also set here that the traffic light does not depend on the task, but on the duration of the entire process. For instance, based on the expected end date of the case. the number of days remaining is then based on the current day with respect to the case. The administrator can set this in the config editor
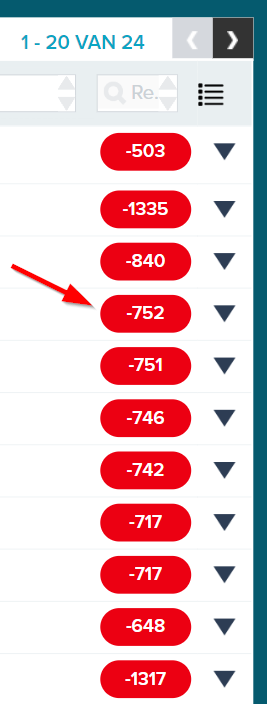
In addition to indicating the deadline for the current activity, the traffic light also has an second function: clicking on the icon opens a screen in which detailed information about the entire process (of a case, for example) is displayed.
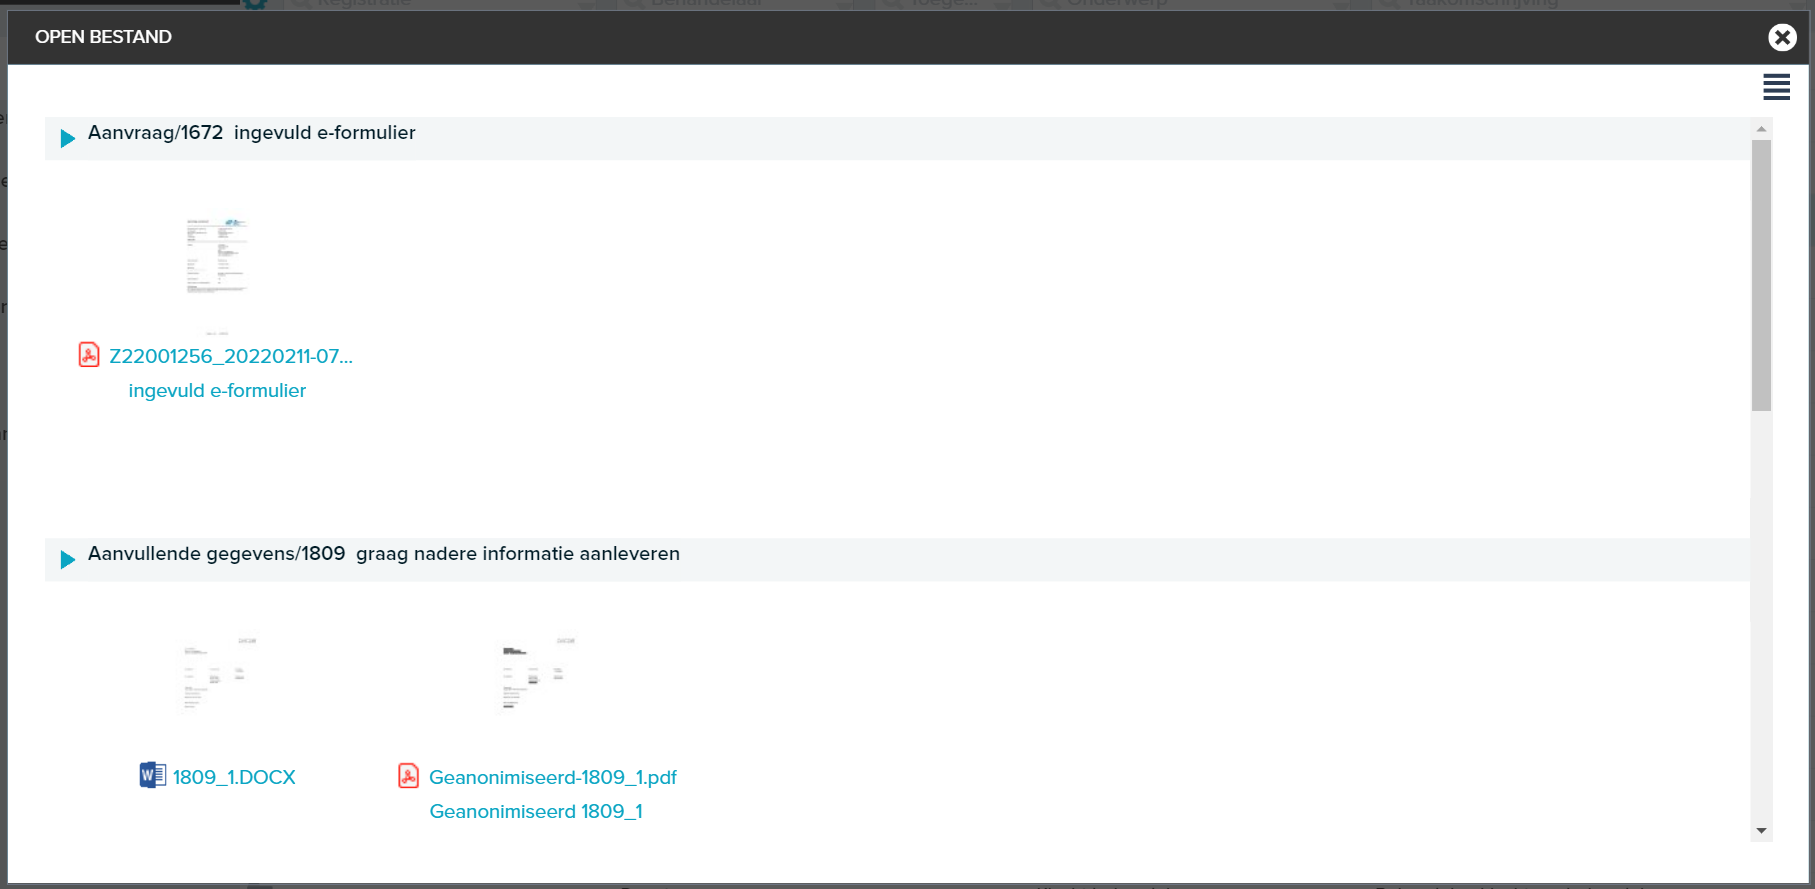
¶ Open files from the work queue
In the left column you will see a file or document icon. With this we indicate whether the action is related to a file / case or document. The blue icon means that you can open files immediately. If there is only 1 file (in a document document), it will open immediately when you click on it.
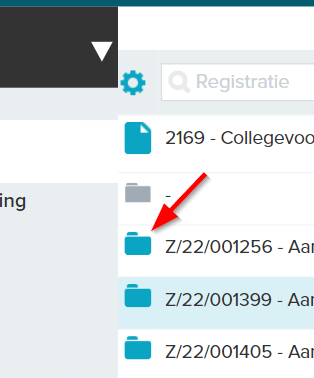
If there are several files, an extra dialog box will open, where these files are clearly displayed. For dossiers and cases, this window is displayed by default, also giving you access to the document data per document. The window does not close automatically (so you can easily open another file) and is by default ordered by last document registered.
¶ Quick Actions
From the list you can quickly and easily access the following actions:
- Handling the task
- Answer function
- Opening the registration
- Forwarding the task
- Adding comments

¶ Searching in the work list
You can easily and quickly perform searches within the lists of the work queue. The easiest way is to use the global search box. As soon as you start typing, the system will filter both visible data from the list, as well as any metadata.
If the search result appears to be too large, you can use the list filters to further refine your search result. Here you can also use operators such as AND, OR, <>,%, =, etc.

If you want to create an overview of your search result, you can do this with the overview function
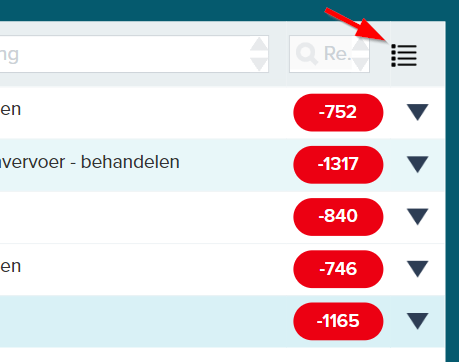
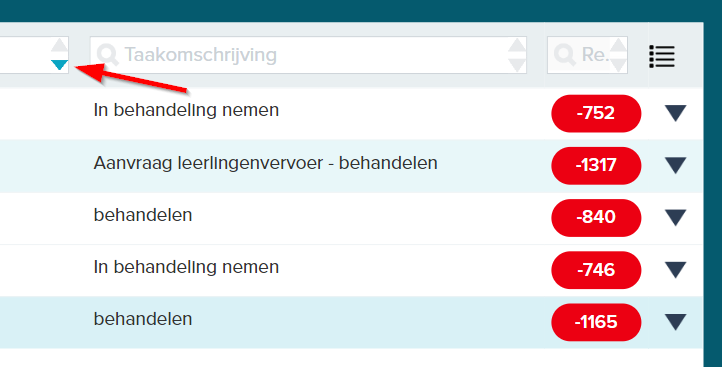
Finally, you can use the sort buttons to sort the columns in ascending and descending order.
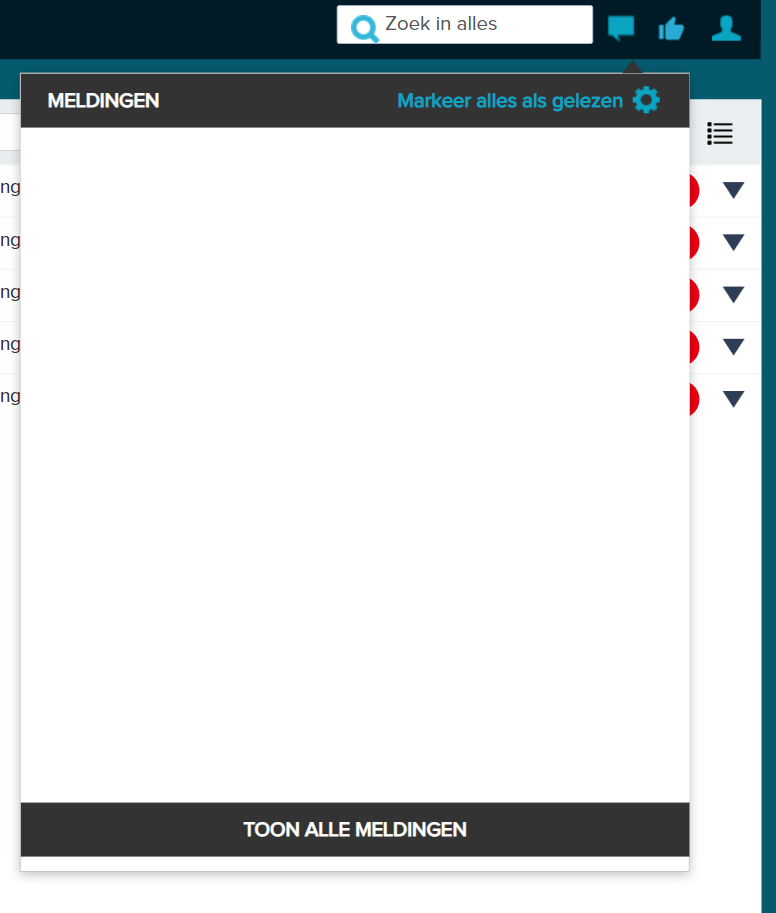
¶ notifications
Via the notification function in the work list we actively inform you about changes in your work list or those of your groups. You can read more about this in the chapter “Notification function”.
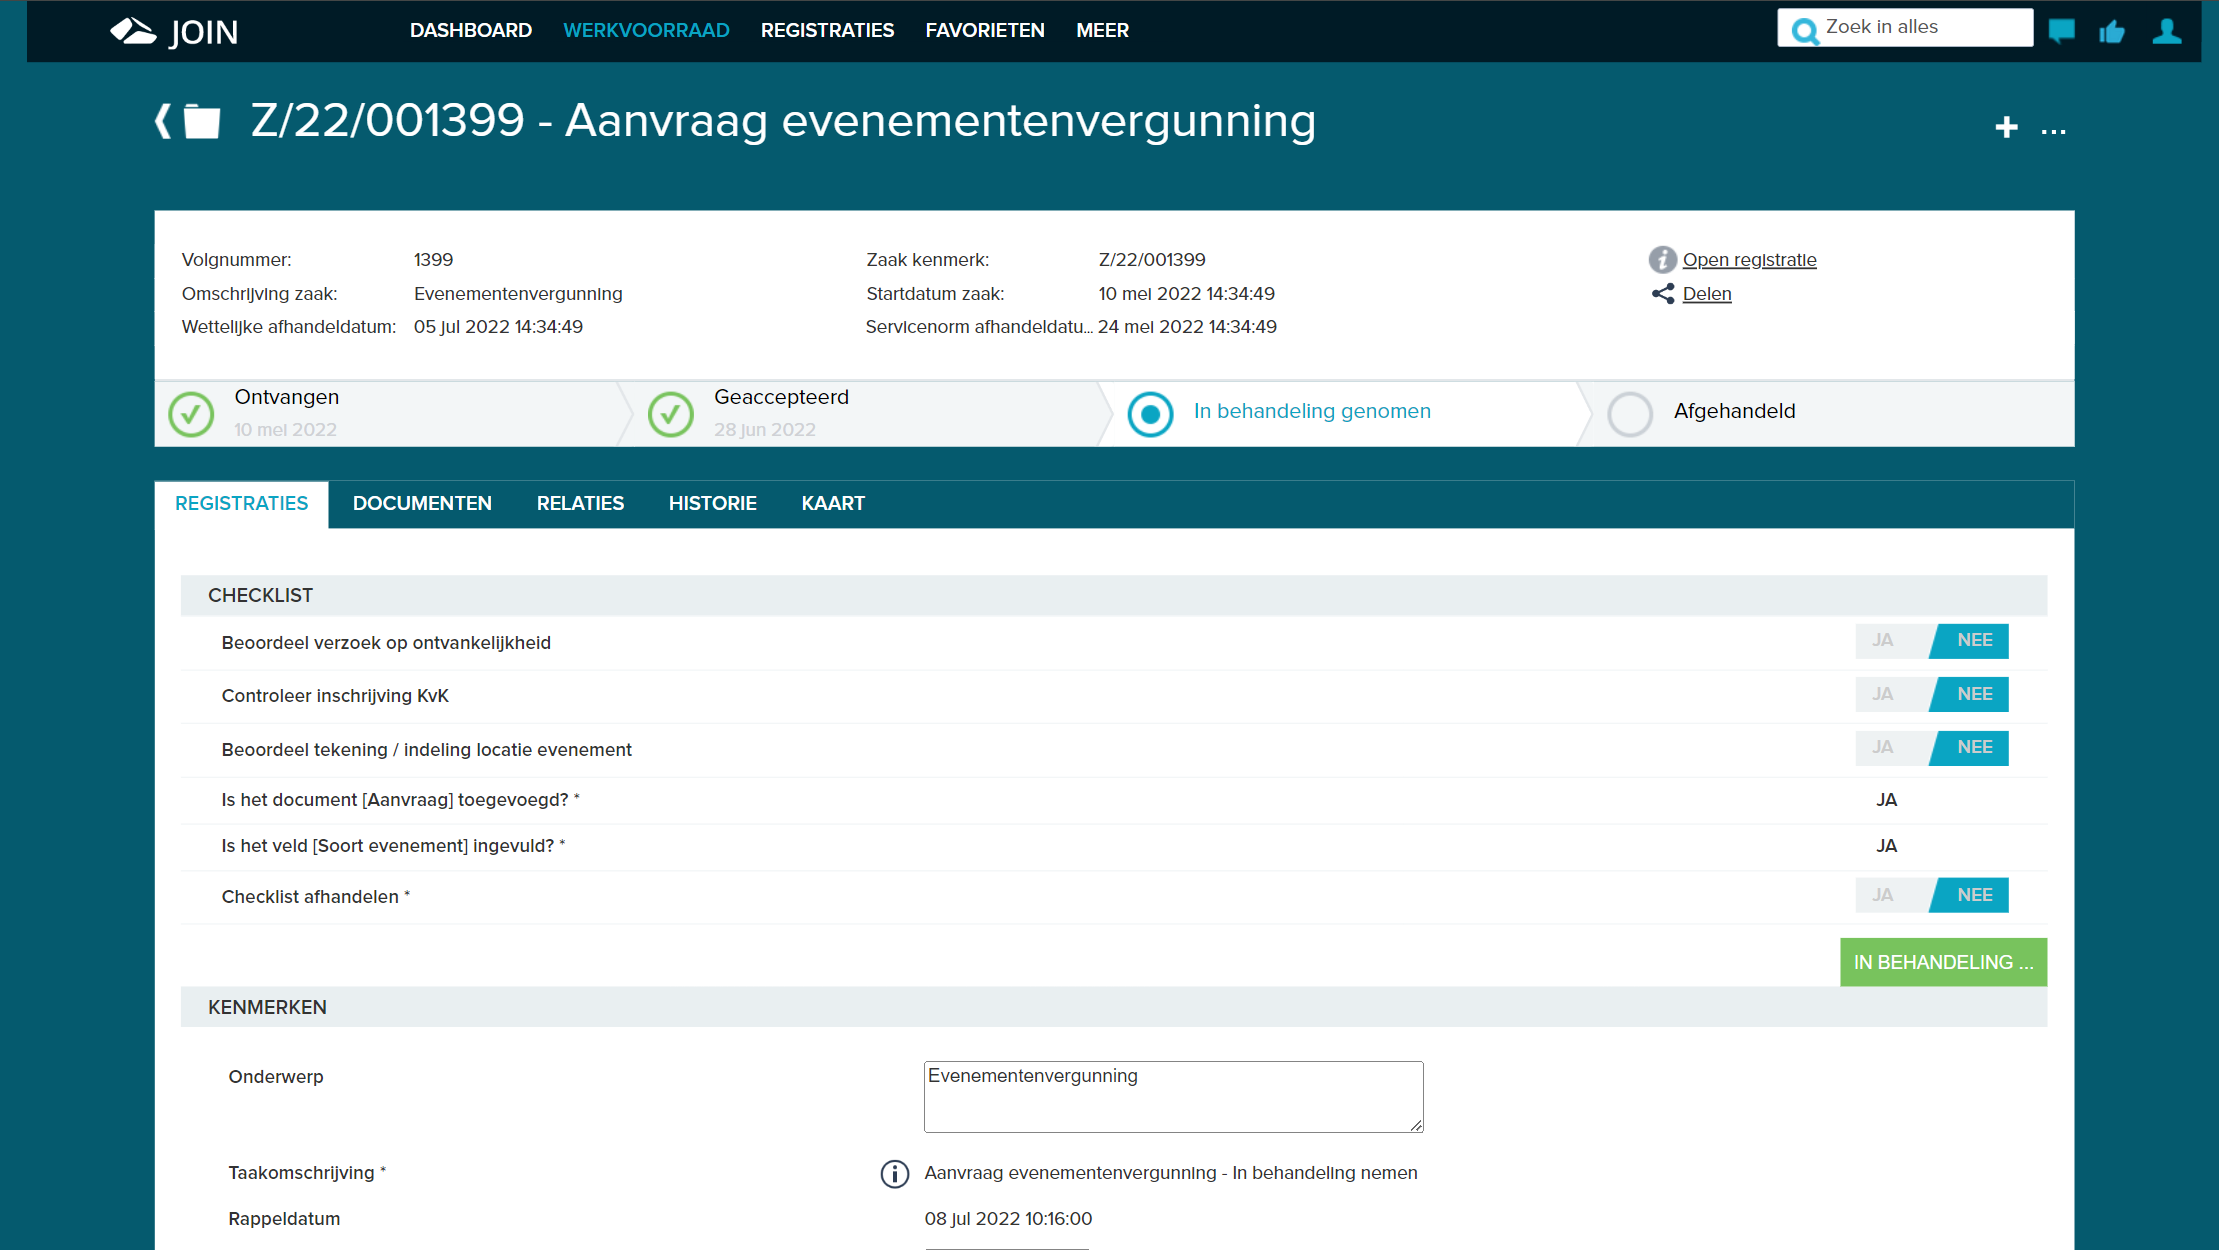
¶ Work stock (detail screen)
Click on this link to watch the instruction video: instruction video “Treatment screens”
¶ Detail screen document action
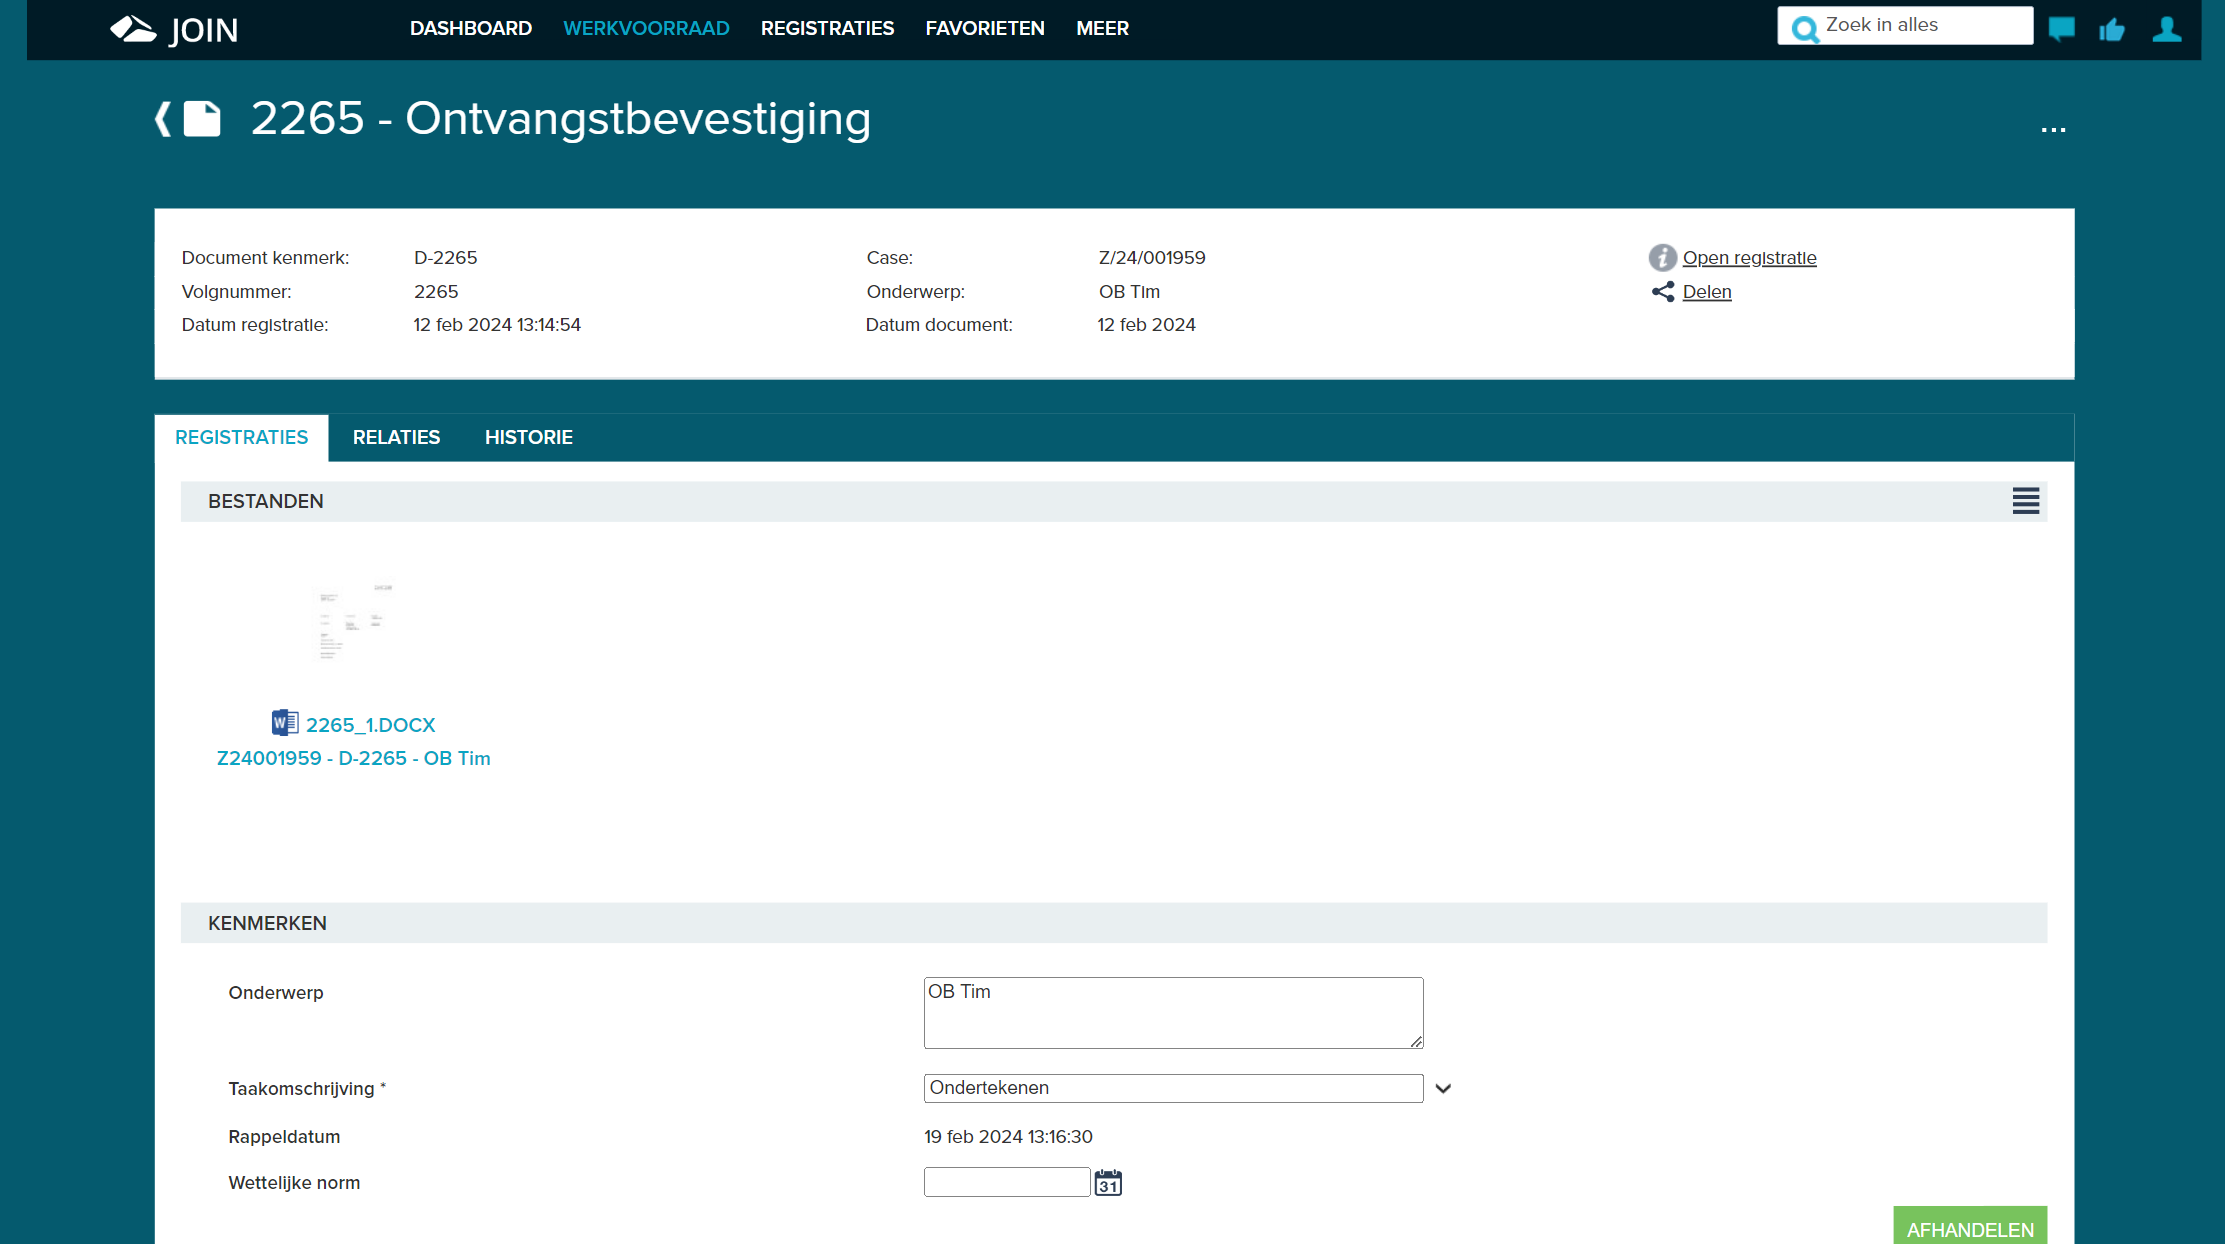
You can read the detail screen for a document action from top to bottom. The following information is shown in sequence:
- Via the registration reference (and arrow) you can return to the work list;
- You will see the first 6 fields of the current registration. If you do not see the correct information, please contact your application manager;
- If these 6 fields do not provide sufficient information, you can consult additional details of the registration via “more information”.

The detail screen consists of 3 tabs: registrations, relations and history
¶ Registrations
The registrations section consists of the following sections:
- The files associated with the document. If you click on the thumbnail of the file, it will open in preview mode. If you click on the file name, the file will open in its own application;
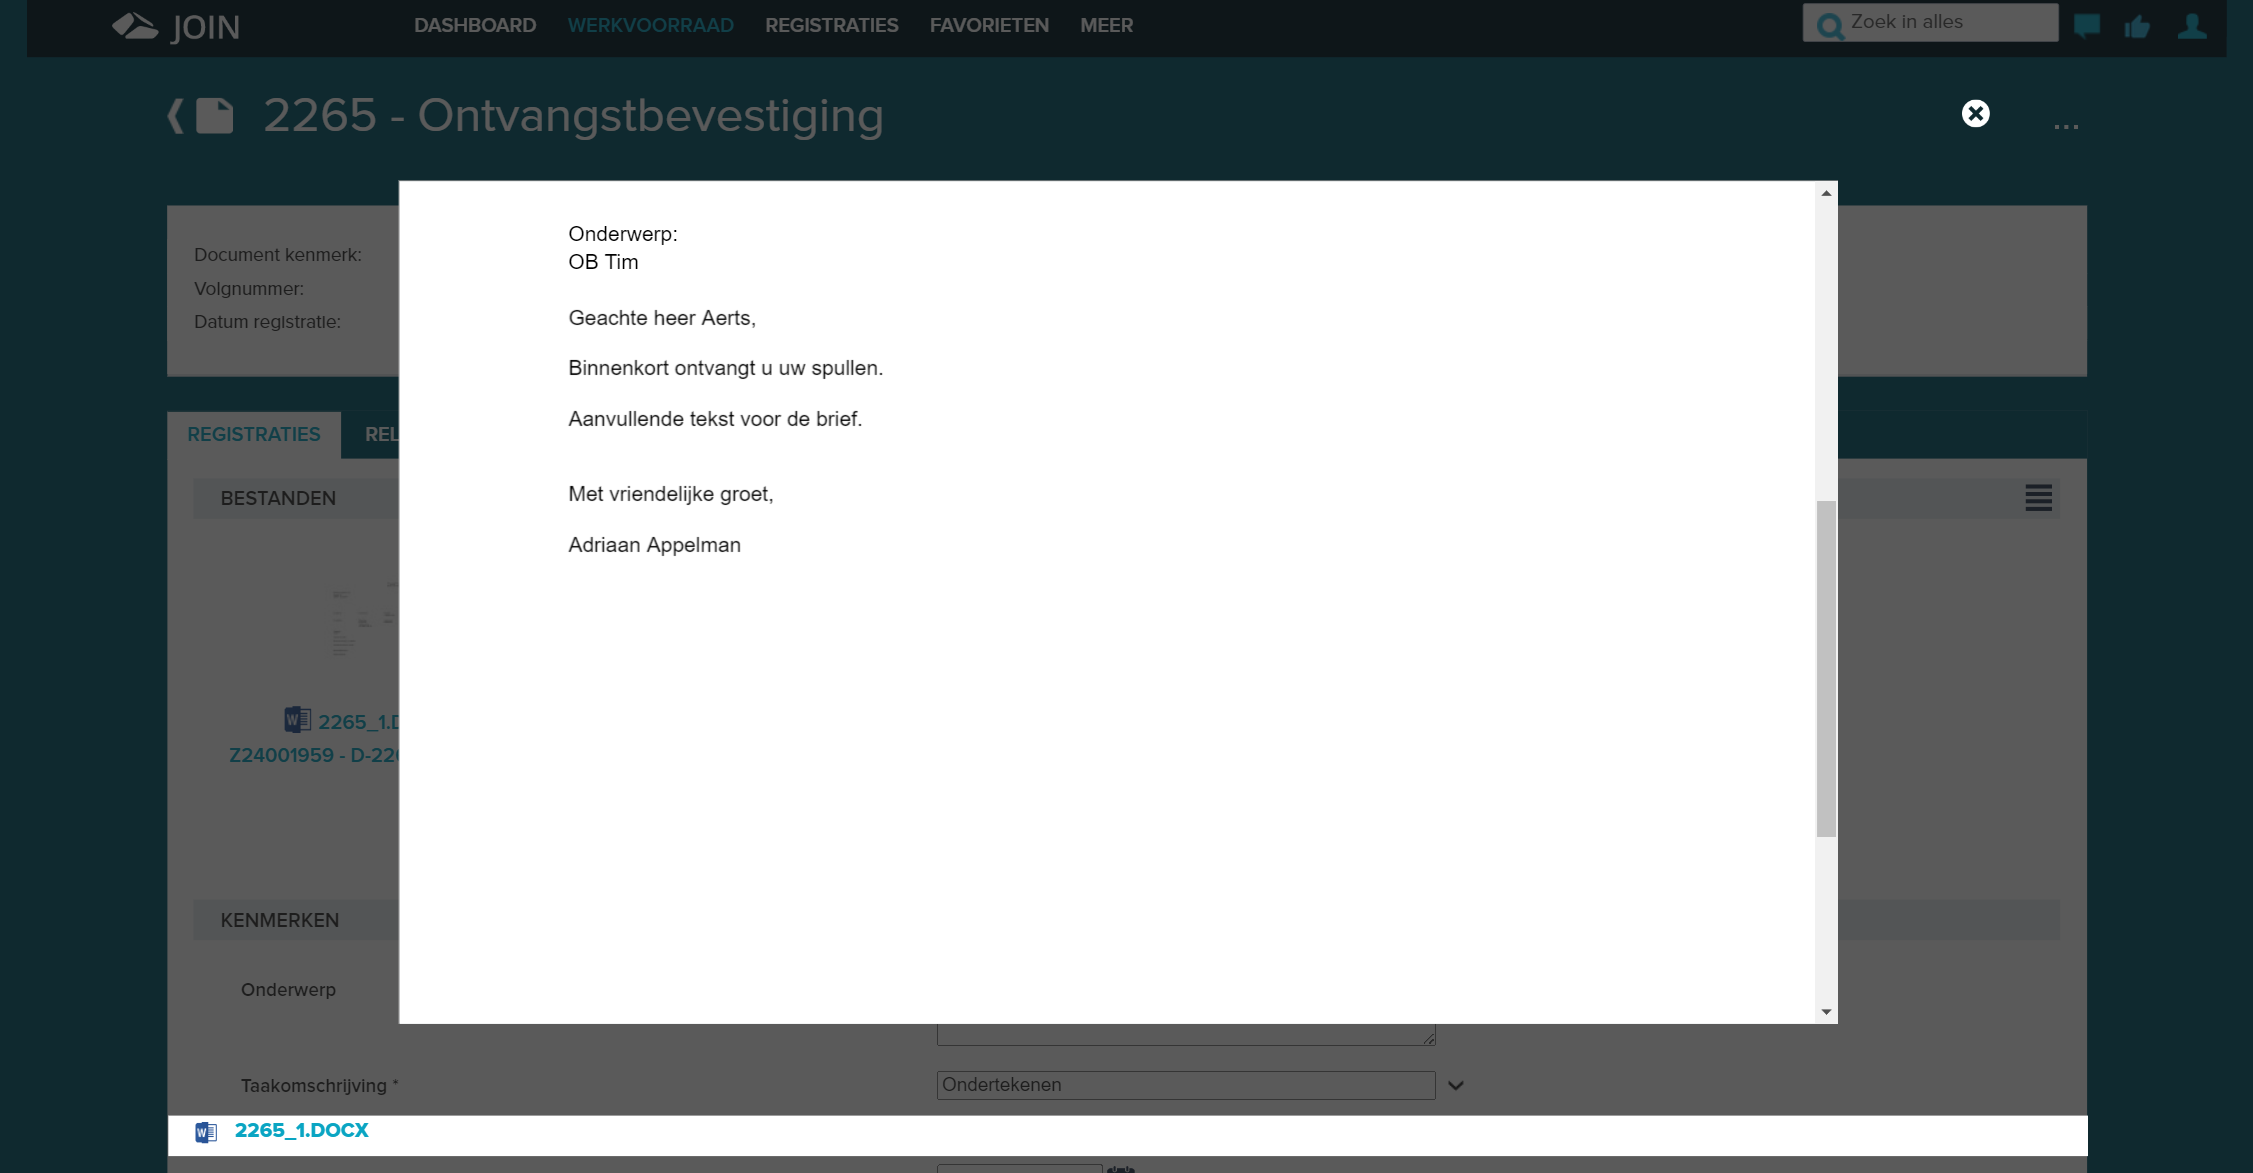
- The details of the task are shown at characteristics. What should you do, when should you do this, etc. If additional information has been recorded in the task description, you can access it via the I-button (left of the task description);
- If the activity contains a checklist or decision, the screen has a different structure. For more information on this, go to the components Checklists or Decisions;

- All comments recorded during the handling of the task are shown in the comment section. See also: chat and comment function.
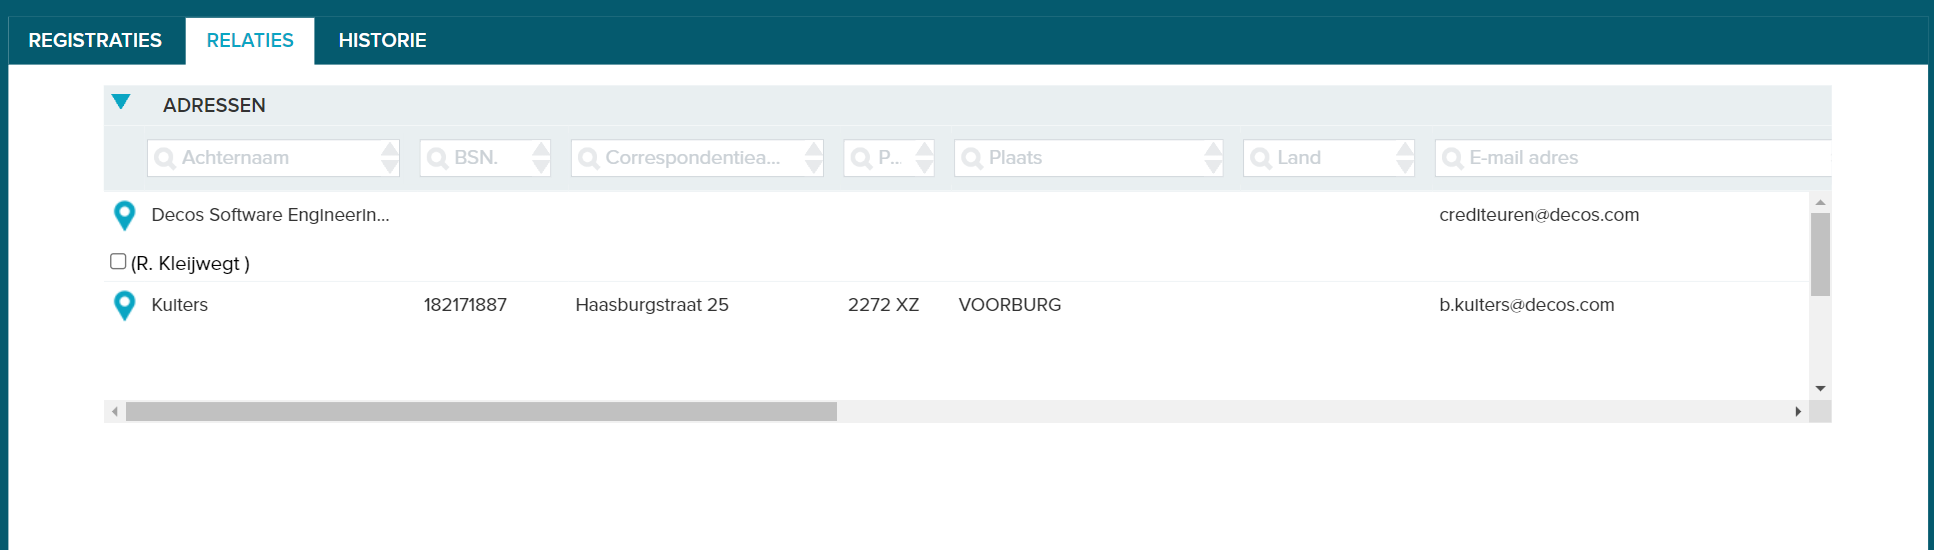
¶ Relations
The relations tab shows all relations that the document (this also applies to a case / dossier) has, such as a linked file, address or other object.
¶ Detail screen case action
The detail screen of a dossier or case does not differ much from the detail screen of a document action. It mainly shows other information that is relevant to a dossier or case. Here are the differences:
- The section “registrations” does not show any files, but immediately shows the action details and any checklist or decision;
- The “documents” tab is specific to a case or case action. In this tab you can easily search for the relevant documents, link, create and possibly sign files.
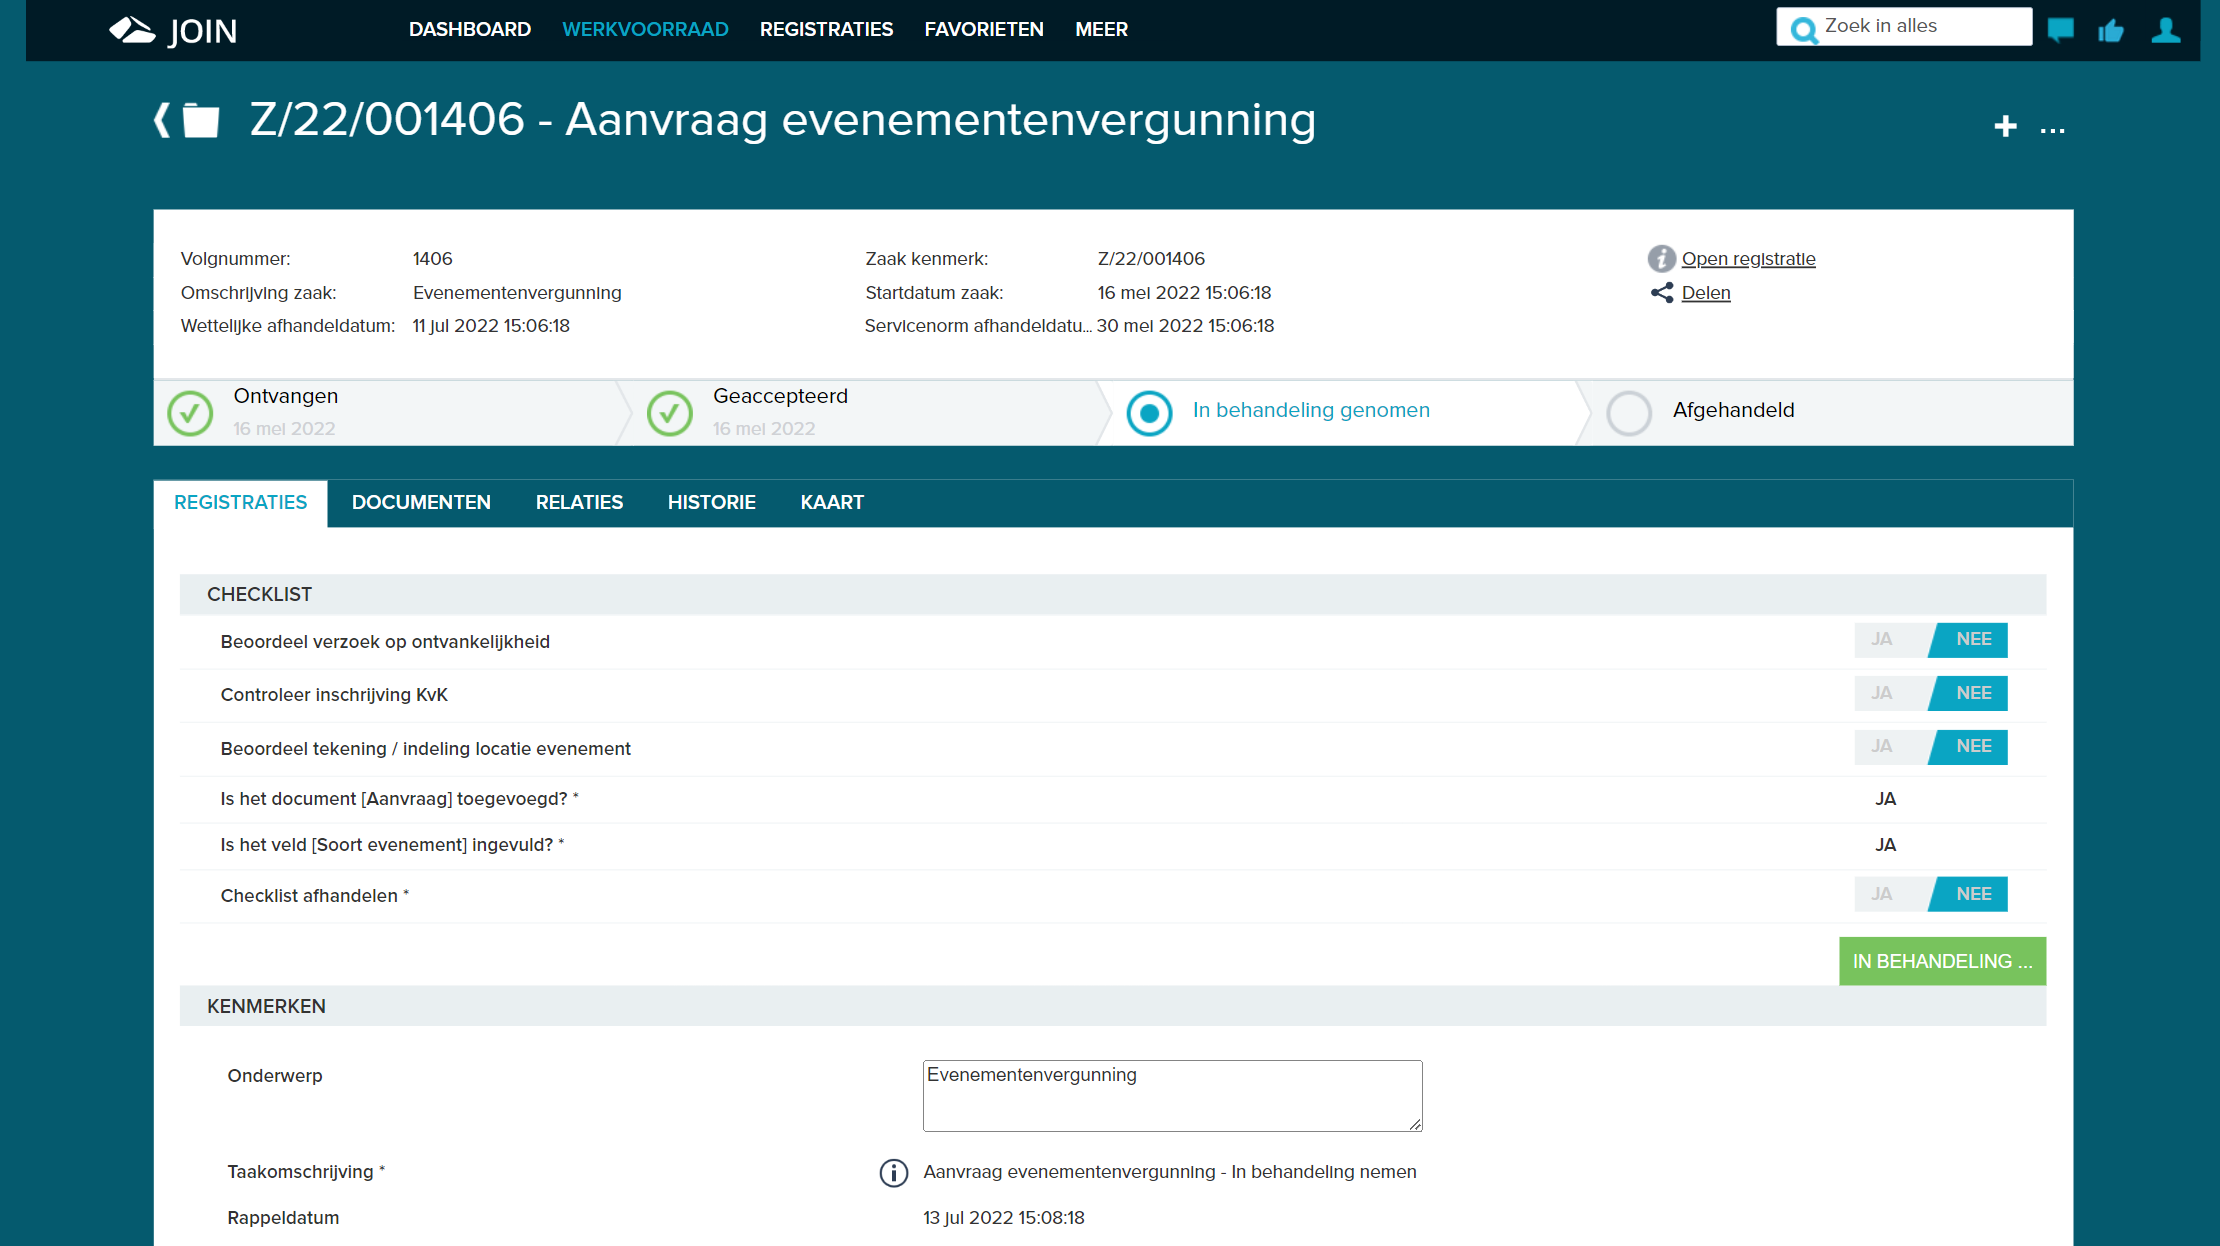
¶ The status bar
The status bar makes it clear at a glance where you are in the process. The status bar is displayed by default in the details screen of both a document and case activity when you use a status table in the workflow. By default, we display the statuses already reached in the detail screen and the status that is reached when the activity is completed. No status table means no status bar. For more information, please contact your application manager.
If you use JOIN Case types, the status display has been further expanded: not only the current and already reached statuses are shown, but also the statuses to come. See the image below to clarify this further.

¶ Chat and comment function
All comments recorded during the handling are shown for activities. Automatic comments are also shown, such as suspensions, linked files, etc. You can edit or delete your own comments at any time.

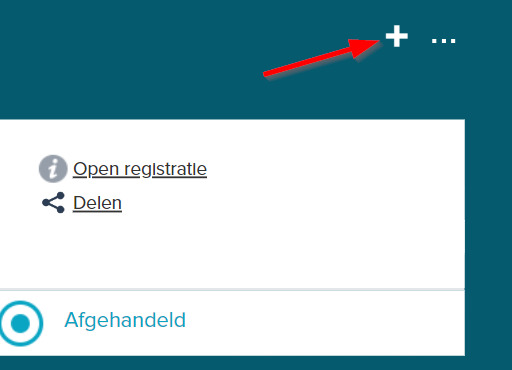
¶ History
In the history section, we show the history of changes made to the entire registration (such as a case or document). You will only see the tab if you have sufficient rights. For more information, please contact your application manager.
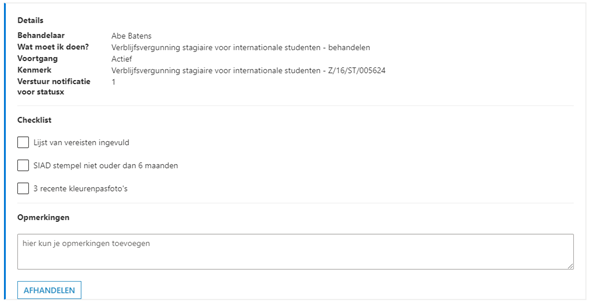
¶ Checklists
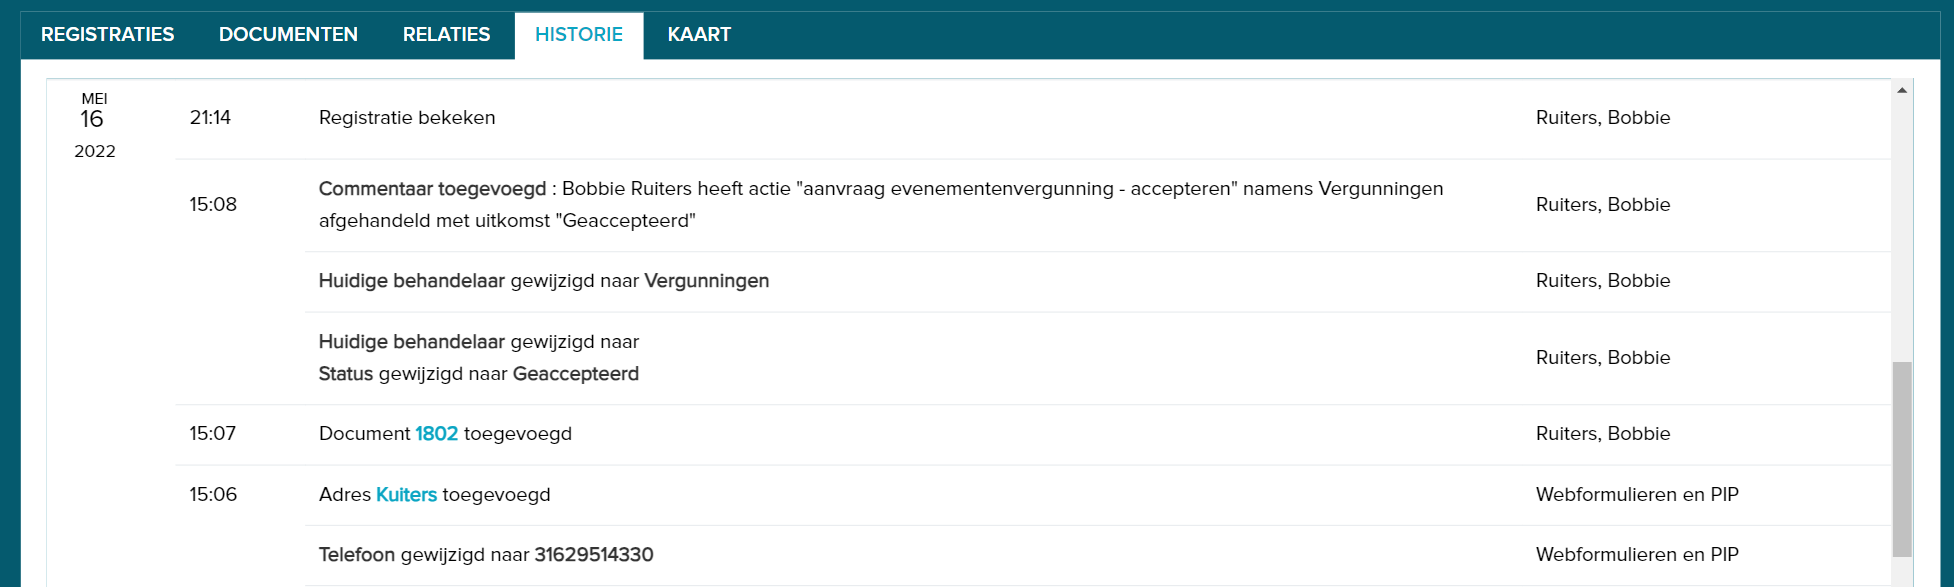
One of the possible action types is the checklist. With a checklist you can combine multiple checklist questions into 1 action. Via the Yes / No function you can “answer” the checklist question.
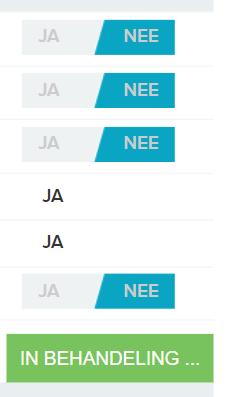
It is also possible to work with automatic checklist questions. An example of this is adding a document or entering a specific registration reference. The checklist question is automatically set to “Yes” as soon as you have added the document, for example.
Finally, a checklist question can be optional or mandatory. You can recognize this by the * after the question (* = mandatory)
If you want to complete the checklist, click on the “finish” button. If you have not yet answered all mandatory checklist questions with yes, we will ask you a confirmation question, which you can ignore if you wish.
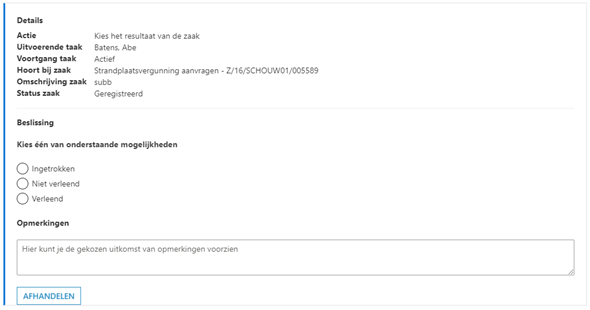
¶ Decisions
A decision is characterized by the possible outcomes of which you must select one. Here, you choose a possible value and click on “finish”.

¶ Handling actions
In addition to the checklist and decision, JOIN also knows the “normal” handling action. All you need to do here to complete the activity is to click the handle button.

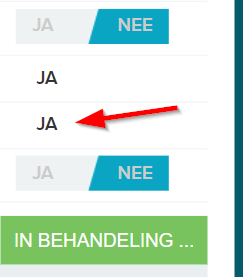
¶ The + and … button
¶ The + button
Via the + button you have the option to add information. For a document, these are the options:
- Create file;
- Link file;
- Link Scan;
- Add manual activity.
These are the options for a dossier / case:
- Create document (registration);
- Create manual activity.
If you use JOIN Case types, the following actions are also possible:
- Create decision;
- Create a subcase.
- Create proposal (only available if you use the JOIN Decision Making module)
In all situations, the availability of the options depends on both the rights you have, the user type you are and the configuration by your application manager.
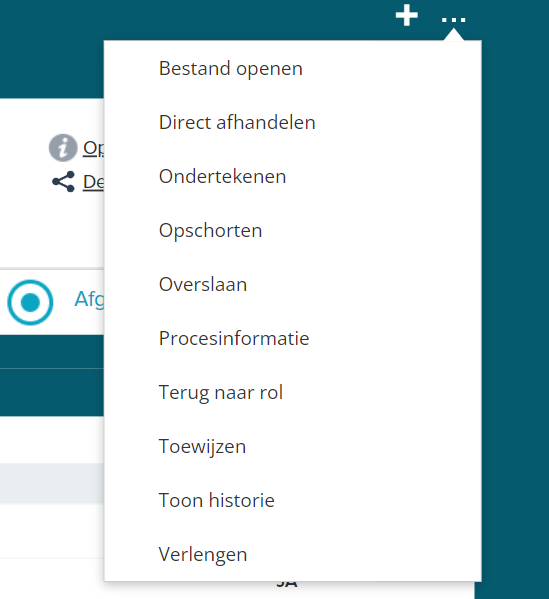
¶ The button
Via the … you have the option to quickly start an action. For a document, these are the options:
- Suspend or postpone;
- Sending an email;
- Signing;
- Cancelling;
- Forwarding.
These are the options for a dossier / case:
- Suspending or placing in in waiting;
- Sending an email;
- Opening a file;
- Signing;
- Cancelling;
- Forwarding.
If you use JOIN Case types, you have access to the following additional actions:
- Extending a case;
- Immediate handling;
- Skipping (since 6.22).
¶ Suspend
When the option “suspend” is active, you can suspend the processing time of the registration (case or document):
-
for a case, the suspension period is added to the legal standard (the date by which the case must be settled according to the legal term). Once the suspension has ended, the legal norm is recalculated with the number of full days that the suspension actually lasted.
-
for a case, the suspension period is added to the service standard (the date by which the case must be settled according to the service term). Once the suspension has ended, the service standard will be recalculated with the number of full days that the suspension actually lasted.
-
The suspension period is also added to the active workflow activity that is being suspended. Upon termination of the suspension, this period will be recalculated with the actual suspension period. The suspension has no consequences for subsequent steps in the workflow.
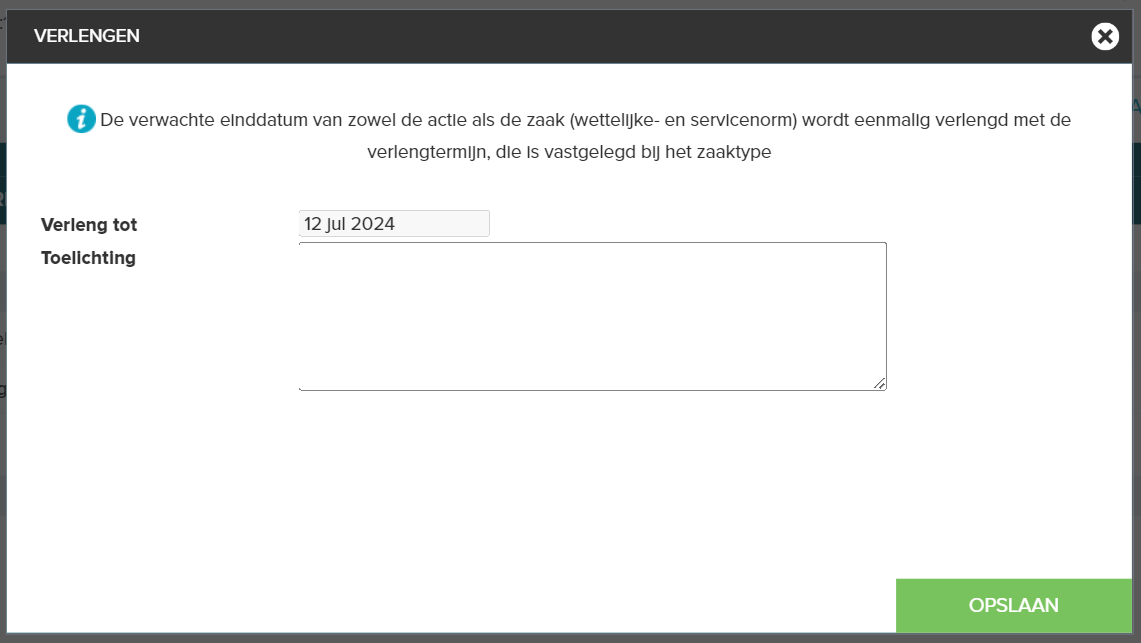
¶ Extend
The option to extend is only available if you are working with JOIN Case types and have set the case type to allow extenson. In this case, you may extend the case once. The legal and service term of the case is extended by this term:
- If a fixed extension period has been set for the case type, the case will be extended by this period
- if no fixed extension period has been set, the handler may choose a date. Note: this date is always in the future!
¶ Skipping
Sometimes you may want to skip certain steps within a case because they are not relevant in the specific case. As of version 6.22, we offer the case handler the standard option “skip” to skip the step (and status).
You will find the “skip” function behind the action button:
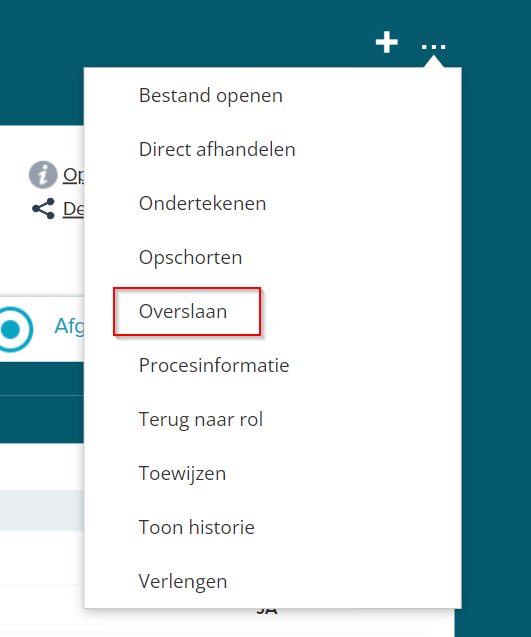
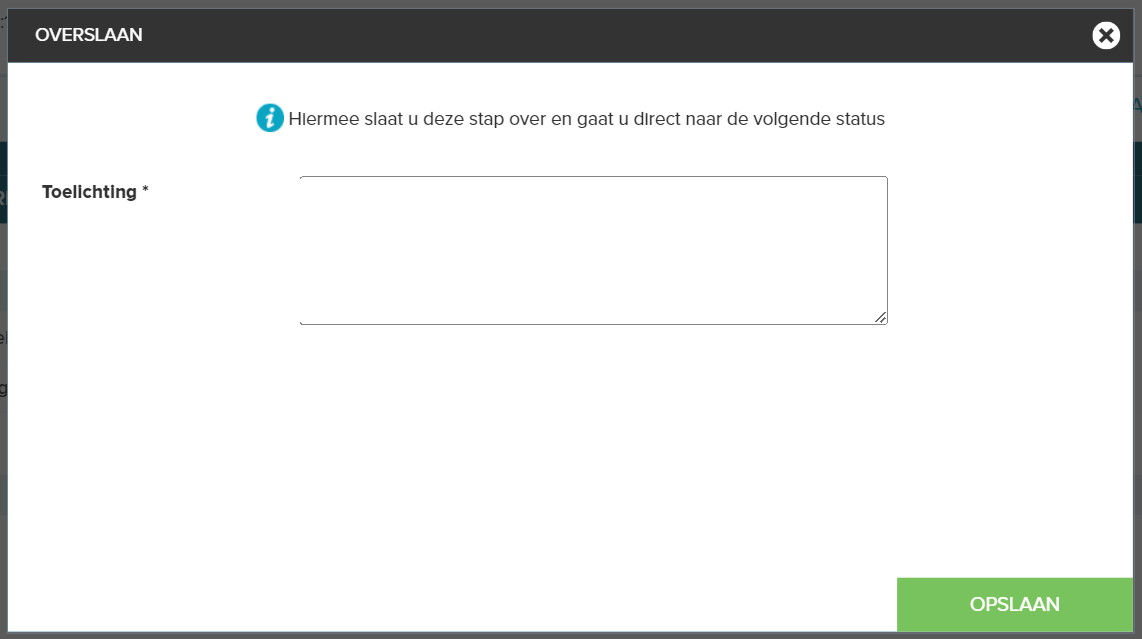
You can optionally provide an explanation (the skip action will be logged) and click on “save”. The current action will be handled immediately (even if it concerns a checklist), but without the status being reached. After all, you skip this one. The next action in the next status is then started. If you are also the handler of this, it will be shown.
Skipping is possible until the result choice in the last status of the case. The result must always be chosen, it cannot be skipped. In this phase, the handler does not see the option.
¶ Create a new document
The most commonly used function in the work list is the creation of a new document. Until version 6.0.12 this function was known as “create response”, but since this version has been renamed to “new document”
The screen to create the document consists of 2 parts:
- the left panel that walks you through the steps
- the right panel where you enter the registration information (description, sender, date, etc.)
In the left pane, select where to save the document. A registration screen is then displayed in the right panel, which you can fill in further. Then choose what you want to do next in the left panel. You have the following options here:
- you select a template (word or mail template) with which you want to create the file
- you upload a file from your local disk
- you create just the registration and add the file(s) later
Finally, click on the “OK” button to complete the action. The screen closes and you can continue with your action in the work list.

¶ Refuse case
Since version 6.22 of JOIN Case & Document, it is possible to refuse a case in the 2nd status of a case (the acceptance phase). Note that this must be set up by the application manager and only works in combination with JOIN Case types.
This is useful, for example, when the case has been incorrectly registered (the case type is incorrectly selected or the case has been incorrectly created).
How does it work?
- In JOIN Case types, the administrator indicates per case type whether the case handler may refuse the case. This is only allowed in the second status of the case type.
- Subsequently, in the handling action of this second status (which is called “accepted” by many organizations), we show an extra option: “refuse”.
- When the handler clicks on the button, a window opens where an explanation can be entered for the refusal. Subsequently, the case is ended and the case is transferred to the team responsible for handling the case refusal. Here you can choose to rebook the case (choose a different case type) or delete the case (for example if it was created incorrectly).
- The reason for refusal and the action is also neatly recorded in the comments / history.

¶ Work inventory and Office 365: actionable messages
Since version 6.26 (JOIN Case & Document, available from July 2019) it is possible to handle actions (handling actions, decisions, checklists) from Outlook. This applies to both Outlook 2016 (the desktop version) and Outlook Online (the browser version). A mailbox at outlook.com or exchange online is required. Note: you must also have a valid Office 365 and JOIN 365 license to use this functionality.
How do you set it up?
- First of all, make sure that every user has access to a working email address that is known in JOIN Case & Document
- Set that the user "may receive notification emails from work queues. You can set this per user in JOIN Admin (part user management)
- Make sure that the settings below are correct in the config editor:
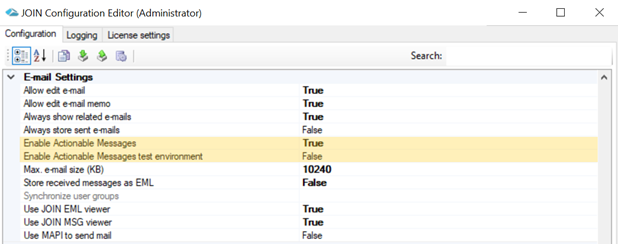
- when the first setting is set to true and the second setting to false, the activity is sent to production. If they are both set to TRUE, the test environment is used.
How does it work?
As soon as an activity is created for a user, they will receive an email with the activity. It looks like the image below. 3 types of activity-emails can be received:
- normal handling activities. You can handle these activities by clicking the confirm button
- decisions: you must first choose an outcome before clicking the confirm button.
- checklists: set checks to YES to handle the action. Please note that you cannot do automatic checks (such as adding a document or filling in fields in the registration) from the email.