¶ Upgrade manual JOIN Case and Document
To be able to upgrade JOIN Business & Document, JOIN Business & Document version 6.0 must be installed. The configuration of the server and the installation of this main version is carried out by a technical specialist from Decos. If your organization uses the JOIN Private Cloud, you only need to install the JOIN Client. If specific actions are required for a version, we will mention this on the release page of the relevant version.
¶ Download
The installation files can be found in the release notes. The available software files are “packed” as a .zip file. After you have downloaded a file, you must first “unzip” it to install the JOIN files. Every update for JOIN Case & Document contains updates for JOIN web, JOIN Admin and the server part of JOIN Now. The patch must be installed on the JOIN web server. If you work with multiple servers, we ask you to coordinate your configuration with our technical specialists.
Note: You must have JOIN Case & Document version 6.0 installed before installing this patch.
¶ Workstations
This update also released a new version of the JOIN Client components. The Client Component Setups contain both components for working with JOIN Case & Document (also known as JOIN File Control) and with JOIN Now (integration with Office). The client is a separate MSI setup that must be installed on the workstations. Below you will find more information about the rollout of the JOIN Client on the workstations.
¶ Executable and MSI setups
Updates to JOIN Case & Document are delivered as Windows Installer executable and in Microsoft Installer format (MSI). We recommend to use the executable version of the setup in a manual installation, the MSI setups are made available for automatic rollout mechanisms. An executable setup has the advantage that it can be installed directly from a network disk. In addition, the original setup does not need to be saved for later configuration changes. To start the installation double click on the executable or on the MSI file, JOIN Case & Document will be updated to the latest version.
To work with MSI, you need the Windows Installer. This is installed by default on Windows XP workstations, Windows Server 2003 server systems and newer Windows versions. If this is not the case, you can download Windows Installer from the Microsoft website. Below you can read how to perform the update step by step on the JOIN server.
¶ Server installation
It is strongly recommended that you install JOIN Case & Document when users are not working in the system. It is very likely that the server will need a restart during installation. Keep this in mind when planning the installation.
¶ Installation step by step
To Do item.
¶ JOIN Connect Service
The JOIN Connect Service contains the SDK components of JOIN. Previously, this web service was active within the Decos D5 website, but this has become a separate Windows Service at JOIN. When started, the JOIN Connect Service will initialize a web service at exactly the same location where it was previously active within the Decos D5 website, so that other parties are not hindered by this change. A small check is necessary to ensure that this location is indeed identical.
From the Decos \ www \ aspxsite folder, open the appsettings.config file. In some cases this contains an absolute URL for the ConnectEntityService or the ConnectBasicHttpEntityService. For example:
Open the JOIN Config Editor and check the following settings:
Image: ConnectURL.png
Image: JOINConfigEditorConnectSettings.png
One of the following three scenarios applies to arrive at the correct configuration:
- The appsettings.config setting is not present, and the DecosWeb Site setting in JOIN Config Editor is the same URL that the end users use to access JOIN. In this case, do not change anything.
- The appsettings.config setting is present, and the URL in appsettings.config starts with the same URL as the DecosWeb Site setting in JOIN Config Editor. In this case, do not change anything.
- The appsettings.config setting is present, but the URL in appsettings.config is not the same. In this case, enter the absolute URL (including http: // servername / decosweb) in the Entity Service URL and / or Basic Http Entity Service URL setting.
¶ Update database
A database update must be performed after every installation. This can be done in 2 ways:
- JOIN Config Editor
- JOIN Admin
¶ JOIN Config Editor
These can be run from the JOIN Configuration Editor. This can be started in the menu on the application server:
File: JOINConfigEditorStartMenu.png
File: JOINDatabaseUpgrade.png
Press the above button “Upgrade database” and confirm the dialog that appears on it:
File: JOINConfirmDatabaseUpgrade.png
If multiple environments are installed on your application server, the Config Editor offers you the option to select an environment at login. Run the database update on any environment.
To successfully execute the database update script, the database login used by Decos needs at least the CREATE TABLE and CREATE INDEX right. If your DBA did not allow this during the installation of Decos, it is necessary to execute the commands manually. The commands that will be executed during the database upgrade are also in the directory where Decos is installed, as shown in the setup performed in the previous chapter. The scripts can be found in the subfolder SQL. It is necessary to run all files from your previous version up to DecosD6.0.000.sql, just like the Config Editor does for you.
¶ JOIN Admin
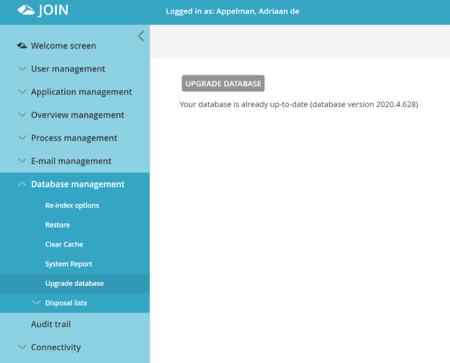
To perform the database update, open JOIN Admin and choose Database Management -> Update Database in the menu. To perform the update, click on the “Update database” button. Your database will then be updated from an earlier version to the most recent version. This may take some time. As soon as the database has been updated, the screen will automatically refresh and you will receive the message: Your database is up-to-date (database version ######).
¶ Installation Elastic Search
JOIN Case & Document uses Elastic as a search engine. Elastic must of course be installed on (one of the) JOIN servers. You can find an instruction here:
JOIN - Search function update Elastic 7.3.1
Should it be necessary to rebuild the Search index after performing the JOIN Update (running the JOIN Search Bulkindexer) this will be explicitly stated.
¶ Check
After installation, we advise you to check whether the upgrade has been successful.
On the JOIN server, go to IIS (Start - Run - InetMgr) to the virtual directory / decosweb / aspx (or just aspx, depending on the location you chose during installation), and open the bin folder under aspx in the Windows Explorer. Get the properties of the Decos.DecosPortal.dll file
File: JOINDecosPortalVersion.png
Check if the version number matches the installed version. The build number behind the version number may differ from the above image.
¶ Installation on the workstations
After the server is updated, it is important to update the workstations as well. If you use Citrix, for example, it is advisable to coordinate with one of our technical specialists in advance.
¶ Client components
JOIN has one joint installation for both the client components of JOIN (DDC) and JOIN Direct (DecosDirect).
If the client setup is run in Typical mode, both JOIN Direct and the JOIN Client components are installed. Choose a custom installation if you only want to install one of the two.
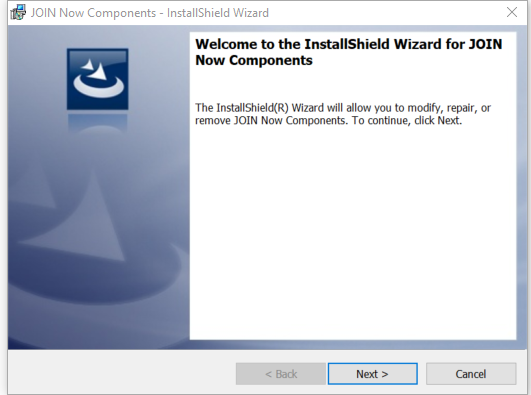
- Click on Next
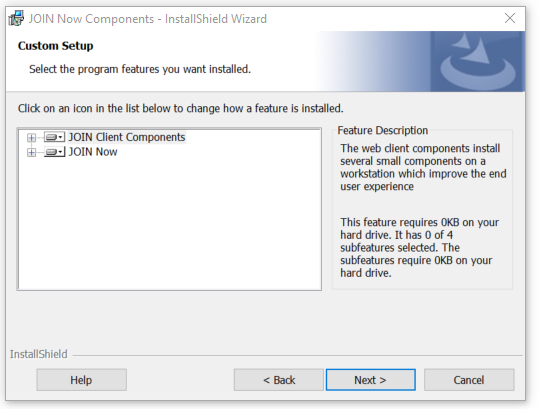
- Click on Next
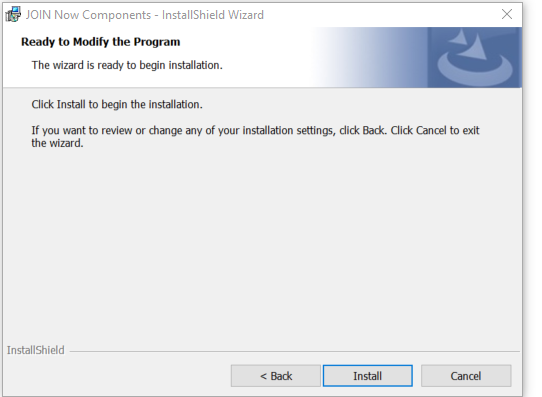
- Click on Install.
- Click on Finish. The client components for JOIN are now installed.
¶ Automatic installation
If you distribute the client components automatically through distribution systems such as Active Directory or Novell Application Library, all components are distributed by default.
If your organization does not use JOIN Now (integration into local applications such as Microsoft Outlook, WORD, Windows Explorer, etc.), you can still roll out all components. JOIN Now automatically detects when no server location is known. In that case, JOIN Now switches itself off.
If you nevertheless do not want to install the JOIN Now Client components during the automatic roll-out, you can do so in two ways:
¶ Deployment with command line parameter
You can influence the behavior of the installer via the command line by specifying which components should be installed:
msiexec.exe /i joinclient.msi ADDLOCAL=“JOINWebClient,Main,DigitalSignature” /qn
Where joinclient.msi must be replaced with the actual file name of the MSI that you are deploying.
¶ MSI Transform
You can go to Orca (https://stackoverflow.com/questions/48315763/how-to-install-orca-which-windows-sdks-contain-the-orca-msi-editing-tool) change the MSI so that the JOIN Now components are not installed by default. Open the MSI via Orca and change the INSTALLLEVEL setting in the Table Property to a value of 45:
File:OrcaInstallLevel.png
After that, you can save the MSI. The JOIN Now components will now no longer be installed by default, so you can distribute this MSI in the normal way for you.
¶ Troubleshooting
no information available yet.