¶ Update interfaces:
The JOIN Integration Adminstration (JIA) offers the administrators of JOIN Case and Document with the associated links a simple way to update the links if, for example, there is a new version for it. Always use the most recent version of JIA (further on this page you will find information about the update of JIA. Click here to find the most recent version. JOIN Integration Administration is part of the JOIN Interfaces Suite. The following interfaces can be found with JOIN Maintain Integration Administration:
- StUF-DCR (Document creation)
- StUF-BG (Basic data)
- StUF-ZKN (Business)
- StUF-LVO (National Environment Desk)
- MessagesBox MOLZ (My Government Current Affairs)
¶ How do I get to this JIA website?
There are two ways to do this:
- By opening a browser on the integration server and navigating to http: // localhost: 81 / Diaweb.
- By opening a browser from the workplace and navigating to https: // integration server name where jia is installed: 8443 / Diaweb.
¶ I am on the website. What now?
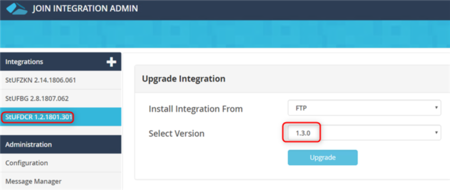
Choose the integration you want to update from the left menu and then click the Upgrade button. JIA will then establish a connection with Decos to check which new versions there are for that link. With a permitted connection over port 80 and 21, JIA will see a following screen where StUFDCR version 1.2 has been chosen as an example and where we see that version 1.3 is available.
Pay attention! If the update concerns a StUFZKN link lower than version 2.8.0 or a StUFBG link lower than 2.1.0, please contact Decos first to ensure the configuration. The configurations of all modern links are kept at https://config.decos.nl.
Pay attention! If the update is a StUFBG link of version 2.4.0 or lower, do not forget to read the instructions in this article.
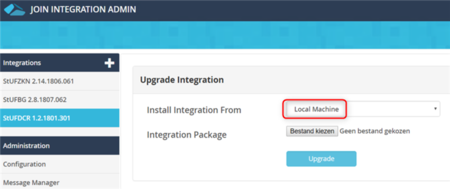
If JIA cannot connect to Decos, you as a user will see the following screen. You can then only choose Local Machine and then navigate to the zip file that you were able to download that you received from Decos Support. Pay attention! Do not extract the zip file you downloaded. So when navigating to the file from JIA, you navigate to the zip file. JIA also takes care of unpacking and processing.
Then click the Update button and wait for the update to be successful. It looks like this:
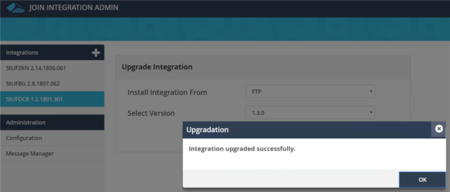
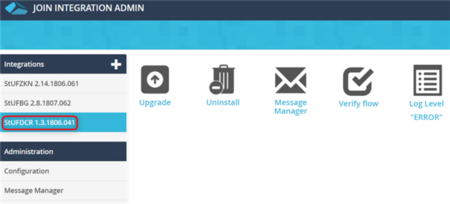
After the success message, click OK and see that the version number has been incremented from the link:
¶ Installation JOIN Integration Administration (JIA):
¶ What is JOIN Integration Administration?
With JIA it is possible to easily perform the upgrade to the latest version of an integration yourself. You can also view the message traffic of the various links.
This article describes the steps required to update or install JIA.
¶ Prerequisites
- The application server must have access to the Internet
JIA will approach the Decos server to retrieve the necessary installation files. For this it will use an outgoing FTP (port 21) and HTTP (port 80).
- Microsoft .Net framework 4.8 must be installed on the application server
The latest version of JIA requires Microsoft .Net framework 4.5. You can download this version from the Microsoft website: https://dotnet.microsoft.com/en-us/download/dotnet-framework/net48
- The role “Windows authentication” must be activated in Microsoft IIS *
This role can most easily be added by means of running the following Powershell command on a Windows server version 2012 or newer.
Install-WindowsFeature “Web-Windows-Auth” -IncludeManagementTools;
Older Windows Server versions use Add-WindowsFeature.
¶ Installation
¶ Step 1: Download Powerschell script
Download the Powershell script to install JIA and the necessary prerequisites. For customers who are still using Windows 2008 or who do not allow an internet connection from the Integration server, the most recent JIA package must also be downloaded:
- Powershell script JIA 2.4.0 and lower: https://support.decos.nl/setups/Integrations/!JIA_JOIN_Integration_Administration/jiainstall.zip
- Powershell script JIA 2.5.0 and higher on Windows Server 2012 and newer: https://support.decos.nl/setups/Integrations/!JIA_JOIN_Integration_Administration/jiainstall.zip
- Powershell script JIA 2.5.0 and higher on Windows Server 2008: https://support.decos.nl/setups/Integrations/!JIA_JOIN_Integration_Administration/Backup/jiainstall_260_voorw2k8.zip
- JIA Package: https://support.decos.nl/setups/integrations/index/downloadJIA.html
After downloading, don’t forget to unblock the zip files.
¶ Step 2: Remove old installation (optional)
If a Decos Integration Administration or JOIN Integration Administration of 2.2.0 or older / lower can be found in Add / Remove Programs, this must first be removed by means of a. the next steps. If not available, continue with Step 3.
- In the Windows services stop the Decos.Integrations.Admin.BackgroundService and close the services screen again.
- Make a copy of the folder that is normally in the following location: D: \ DECOS \ apps \ Decos Integration Administration. Normally it says, but there are customers who have installed something on C: or E or even a completely different location.
- The old version of Decos / JOIN Integration Administration can then be removed via Add / Remove Programs.
¶ Step 3: Extract the zip file
Unzip the jiainstall.zip file to a convenient location. A frequently used suggestion: D: \ _ Install \ Integrations \ JIA. If it concerns a Windows 2008 server or no interconnection, also place the zip file jia.zip in this folder, but do not extract it!
¶ Step 4: Run x64 Powershell command prompt
Note: only perform this step if you are still using a Windows 2008 Server
Open an x64 Powershell command prompt as Administrator (run as Administrator) and run the following command: Set-ExecutionPolicy unrestricted -Scope Process and answer with a capital Y.
¶ Step 5: Perform installation
In the same screen, navigate to the folder where you put the zips and run the following command:. \ Jiainstaller.ps1
If it is a Windows 2008 server or there is no internet connection then run the following command:. \ Jiainstaller.ps1 jia.zip
Note: by uninstalling the old Decos / JOIN Integration Administration software, the script may display a message that the service is missing. So this is correct.
The script will now display a number of prompts. Always choose the highest JIA version, but never the Development version unless instructions have been received from Decos.
When you upgrade to version 2.5 or higher, the script will ask some additional questions:

- The IP address of the JOIN Case & Document server
You can choose the default value by pressing enter if your integration installation is installed on the same server as JOIN Case & Document. If JOIN Case & Document and your integration installation are installed on different application servers, the IP address of the JOIN Case & Document server must be entered here.
- The REST api baseurl:
A REST API is available since JOIN version 6.25. JIA now also uses JOIN authentication to log in to JIA. Only users with the administrator rights in JOIN Case & Document are allowed to log into JIA. The REST API url is the same as the JOIN URL. For example https://zaaksysteem.meervoort.nl/aspx/ The entire URL including / must be entered.
To test the URL before entering this option, you can check the Swagger UI to test the URL. You should see the Swagger welcome page, and not get redirected to JOIN Case & Document.
Example URL: https://zaaksysteem.joinsuite.nl/aspx/swagger/ui/index
- A Connect system name of one of your integrations
Enter the name of 1 of your integration Connect systems here. The default value ‘STUFBG’ can be confirmed by pressing enter. If this system does not exist, you can enter another value. Look for available systems in the list of systems in JOIN Management.
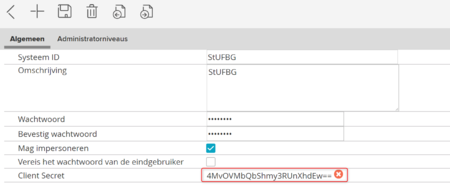
- The client secret of the entered Connect system
Enter the client secret of the Connect system chosen in question 2 here. You can find this value in JOIN Management at the relevant Connect system:
¶ Step 6: Completing the installation
As soon as the script is finished you are back at the prompt and it can be closed, provided there are no more errors. A local group DIA has now been created. All users who want to access JIA must added t othis group. Windows 2008 Server: If it concerns a Windows 2008 server, it is also necessary to check whether the DIAWeb Application Pool in IIS has .Net 4.0 as version instead of the standard 2.0.
¶ Step 7: Edit the allowed URL’s
As a new feature, you need to add the URL’s you want the JIA to be accessed from, in JOIN admin, under the System Configuration as set in step 3. Don’t forget to add login.aspx to the URL’s. In example, URL’s http://localhost:81/DIAWeb/Login.aspx,https://localhost:8443/DIAWeb/login.aspx need to be added, if you want to allow the JIA to be accessed from the server itself. Also add the server URL for external access.
¶ Step 8: Test the connections
You can now open a web browser to http://[server name]:81/Diaweb or https://[server name]:8443/Diaweb. If you are logged into the server, the server name may of course also be localhost.
From version 2.5, access to JIA is linked to your JOIN Case & Document login. If you are designated as a JOIN administrator, you can log in. If you are not yet logged in to JOIN Case & Document, you will be redirected to the JOIN login page when you approach JIA.
The installation has been successfully completed!
¶ JOIN XML Import service
If you are using the JOIN XML Import service, you can find the installation and configuration information here: https://decos.freshdesk.com/a/solutions/articles/17000103095
¶ Troubleshooting
Did something go wrong with the installation? Then contact one of our technical specialists or the JOIN Support department.